 If you live in Texas then you are probably familiar with stormwater detention ponds. You most likely see them every day as you navigate the roads and highways in your town or city.
Let’s face it; detention ponds are a fact of life for commercial property owners, schools, multi-family owners, and even subdivisions. And as you already know, some look better than others.
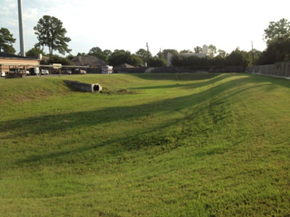
But why is it that the pond in your subdivision (typically a dual purpose pond with a wet portion located several feet below street level combined with a detention portion from the water surface to street level) looks pretty, and others look like they are still under construction years after completion? And some look more like a jungle or swamp than a detention pond.
 The reasons can be numerous, ranging from improper design, over-excavation, or lack of maintenance.
The Challenge
But the problem typically starts with the design and/or construction. Earthmoving activities like grading and underground utility installation are the first step in the construction process.
And that includes digging the detention pond. In a perfect world, the detention pond is dug and then seeded or sodded to stabilize the soil to prevent erosion.
In reality, this stabilization usually doesn’t occur until the end of the project. And often seems to be an afterthought with no regard for soil conditions nor any real thought concerning proper slope stabilization.
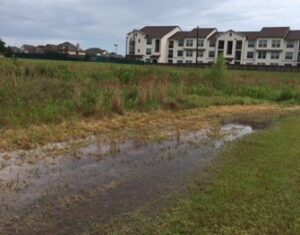
The result is often sparse vegetation at best and rilled out, unvegetated slopes that will need to be regraded and restabilized at worst.
 The reason is simple. After completing the project, the whole site will need to be stabilized (meaning no exposed soils) with hydromulch or sod. So why incur the added cost of hydromulching the pond as soon as it’s dug and then bring the hydromulch crew back out at project completion to hydromulch the rest of the site. Makes sense, right?
Unfortunately, it really doesn’t. When construction has been completed, the pond, left unstabilized, will wash out and need to be regraded. So now the dirt contractor will require a change order to regrade the pond, wiping out any cost savings on cheap hydromulch.
The good news is that this cycle of grade, spray, wash out, repeat can be eliminated quite easily by using proper techniques in the first place. And it doesn’t take much effort to do so. Just a little intentionality.
It Starts With The Soil
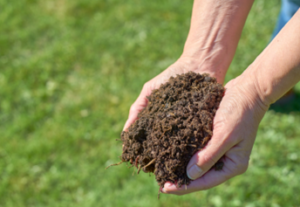 So, where do we start? We always start with the soil. The soil is the engine that drives growth.
Remember, the soils in the pond haven’t been exposed to oxygen, and therefore organic material builds up for years, decades, or possibly millennia.
The typical makeup of these soils is clay, sand, and silt. Not the most conducive media for growing anything except weeds.
Any attempt to establish growth in these conditions is simply a waste of time and resources and will undoubtedly lead to frustration and most definitely add to the job cost.
The solution to avoid this problem is a simple soils test. This provides an analysis of the current soil conditions and a prescription to appropriately amend the soil to provide favorable growing conditions.
Now I’ll be the first to admit that not all of the suggested amendments are always necessary. But the soils report gives us a good understanding of the current soil conditions like P.H., alkalinity, organics, soil makeup, etc. This helps us decide what is necessary and what is “extra.”
How Do You Grass The Detention Pond?
Once we have an idea of the current soil conditions and how to create a more favorable growing media, we need to decide how to grass the pond. The options are sod or seed. Sod is an excellent choice if you have irrigation as it has high water needs for the first 2 weeks of growth. We’re talking saturated ground to allow the roots to take hold of the existing soil.
But without a dedicated water source, the sod will die in short order. Let me reiterate; if you don’t have irrigation and aren’t willing to install it, we need to find another option. But before we do, let’s talk about the benefits of sod. Sod gives you instant grass and a couple of inches of excellent soil favorable for growth.
So if you need grass now and are willing to irrigate, this is a great choice; however, it is the most expensive option and must be stapled down on slopes to avoid sliding to the pond floor.
 The most common technique for applying seed to large areas like detention ponds is hydromulch.
There are many hydromulch products for different uses. Still, unfortunately, almost always we see general contractors using the cheapest paper-based hydromulch.
This mulched paper is mixed with seed, fertilizer, and water and sprayed on the pond. While O.K. for flat ground, paper hydromulch is never recommended for pond slopes.
The reason should be evident: there is nothing to hold the seed or paper on the slope. What inadvertently happens is the first good rain washes everything off of the slope, leaving the soil exposed and subject to erosion.
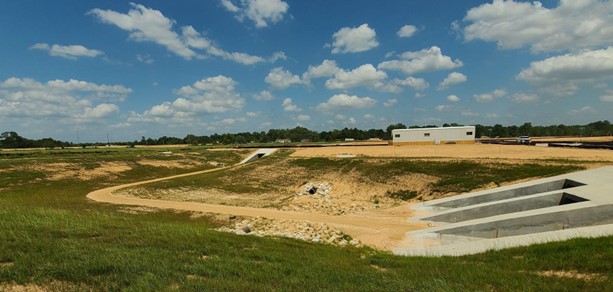
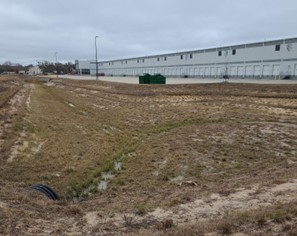
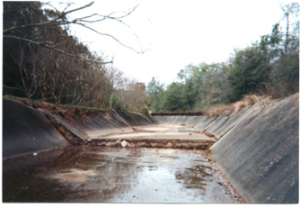
Freshly sprayed with paper mulch. Note the concrete pilot channel full of sediment washed off of the slope.
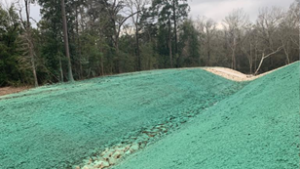
Fortunately, there are many hydromulch products that are specifically designed for slopes and include wood or coconut mulch which are more robust than paper, as well as tackifiers (glue) that hold the mulch product, seed, and fertilizer in place while waiting for the grass to establish.
What’s The Best Option?
So which is the best? Well, that really depends on your budget and risk tolerance. Let’s break it down from least effective to most effective:
Paper Hydromulch– As shown above, this is not a viable option if your goal is to stabilize the slope with grasses. I can only recommend paper mulch for flat ground with no flow. Water flows across the floor in a detention pond, so this is really a non-starter.
Paper/Wood Hydromulch with Tackifier added– This combination gives us more protection than straight paper. Wood is more durable than paper mulch. But without the tackifier, even wood/paper blends won’t stay in place on the slope.
The addition of a tackifier (typically made of Guar gum) greatly aids in keeping everything (mulch, fertilizer, seed) on the slope until the seeds can germinate. That being said this is still risky if you consider the heavy, short burst rain events we experience in Texas. If I were to give you a percentage it would be 50-60% efficacy.
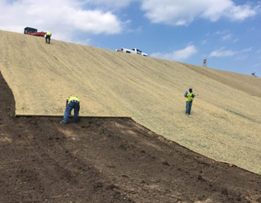 Erosion Control Blankets-As the name implies, these are rolled products designed to be laid out on top of a hydromulched surface. So you have to spray something (preferably paper/wood with a tackifier) first and then lay the blanket on top.
The idea here is to mitigate the erosive effects of rain hitting the ground and dislodging the soil, seeds, and fertilizer. These blankets come in many configurations using straw, wood, or coconut fibers, depending on how long you need protection. These products are not permanent and are designed to degrade over time.
Straw will last about a year. Plenty of time to establish vegetation. So, in my opinion, S1S straw (Straw one side) is all you really need if this is the route you choose.
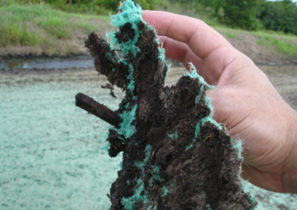 Hydraulically applied blankets: Rolled erosion control blankets have an Achilles Heel. Intimate contact with the soil is crucial if they are to work. This means the soil needs to be graded very smoothly. Additionally, rocks or sticks will need to be removed so that the blanket is touching the soil (intimate contact) and not tenting above it. To combat this, companies like Profile Products developed hydraulically applied erosion control blankets.
These products are applied like hydromulch, but that’s where the similarities end. Specifically engineered to bind to itself and the soil, these products are sprayed at 2-3 times the volume of traditional hydromulch. Once cured (2-24 hrs), they are designed to withstand even the heaviest downpours, with little to no soil loss.
The cost for this level of confidence is high, though. Running about $2/sqyd. Not cheap when compared to sod which is about the same price. But in addition to protecting the soils, these products have excellent water holding capacity, so there is no need for irrigation.
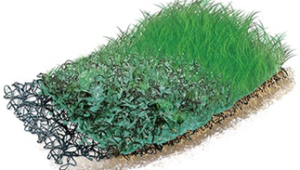 Turf Reinforcement Mats– Reserved for those extreme cases where slopes are greater than 3/1, as well as flow channels, TRMs are permanent rolled products that are infilled with Flexterra or other high performance hydromulch products.
Temporarily held in place with sod staples, these mats are designed to integrate with the root zone to create a solid mass of turf with a shear strength close to concrete!
The main benefit of this system over concrete or “hard armouring” is that the material is flexible, eliminating cracking and hefting that can be seen in many concrete flow channels.
Additionally, being a vegetated system, it provides a more natural look. Of course, there are other ideas and many products out there other than those I just mentioned.
These are just my preference based on years of trial and error and experimentation with different ideologies and techniques.
Regardless of the option you go with, it is imperative to know the soil conditions and amend if necessary before attempting any stabilization, as none of these products are effective against poor soils.
Final Thoughts
I’ll end with a story to prove my point. Somewhere around 2010, I was called out to take a look at a detention pond that was mostly vegetated. Still, there were several areas of the pond floor that had no growth at all.
This seemed strange in that the majority of the pond had a good stand of grass, but these areas were barren. The customer told me that they had sprayed these areas with hydromulch 6 times! I was surprised as this must have cost a fortune to mobilize a hydromulch crew this many times, but it gave me a good idea of the problem. I immediately suspected that the soil must be the issue and proceeded to take some soil samples. The analysis revealed heavy sodium content.
High salt concentrations are detrimental to plant growth, robbing the root zone of water and stressing plants out. In this case, the grasses couldn’t become established, leaving dirt patches on the pond floor.
Using this information, we were able to add a sodium neutralizer to the hydromulch mix and spray the bare areas one more time. After a couple of weeks, I visited the site to find a solid stand of grass with no more bare spots.
The good news is that when it comes to slope stabilization, there really is no need to guess at the proper solution nor just spray and pray. We can use technology to provide the appropriate analysis and remediation to achieve a full stand of grass the first time.
If you would like to learn more about how we can help you with your specific needs, request a site assessment. Give us a call today at (832) 554-6654 or email us at info@swpgrp.com